When working on an opensource project or library, it's really important to release often new versions and to document them properly.
In this post I'm not going to talk about the benefits of frequent releases in software development, I'm just going to help you to mitigate the main problem associated to frequents releases: The release overhead which is the time you spend on preparing each release. This overhead is not that big at first, but when releasing really often it becomes a boring repetitive time-consuming task that could eventually make you release less often.
The most efficient way to reduce this overhead is by automating most parts of the release process, with the help of the tools you use on your daily development process.
First of all, let's detect the most common steps involved in a release:
- Implement the release features.
- Increase the version of the library.
- Update the changelog with all the relevant changes since last version.
- If you've accepted pull requests or contributions, give some credit to the new contributors.
- Update the library website of the library with all the new info above.
- Push all the changes to the GitHub repository and create a tag for the new version.
- Publish the new version to the correspondent library repository.
Once all those steps are done, then you can start working on the next release and repeate all the steps again.
1. Implement the release features
Although this step does not really belong to the release process, this is the most important thing to do in a release: if you don't add anything new or fix something in your library, there is no point doing a new release, it's important to plan which kind of release you're planning to do (major, minor, bug fix) and what changes are you going to include.
Before starting the development of your next version, you should update your library's README file to reflect the new usage options that the new version will have (if any). This will guide you through the development process like some kind of specification and you'll get the benefits of the Readme Driven Development.
You should try to keep the documentation really simple: In most cases just a README.md file with some
simple usage examples are enough.
If you need more in-deep examples, you can create them in the examples/ folder. If you document the
using inline comments with the Dooco syntax, you'll be able to
transform them to beautiful HTML files with all the comments displayed alongside the code.
Also, I recommend you to create a new branch for the release, commiting all your changes there, and once done then merge them to the master branch.
2. Increase the version of the library
Once all the changes are implemented and tested (all your tests pass ‐ you're doing TDD, don't you?) and the README is updated, it starts the release process.
First thing to do is to increase the library version. In some place in your library you must define
the current version. If you're planning to publish your library to a package manager you should
insert the current version in some specific place (for example in the gemspec file for
RubyGems or in the package.json file for npm).
It's recommended to define the package version in just a single place, if you need the library version somewhere else you should get it from this single place where it's defined.
For example in Node.js packages, if you want to make the version available to the outside, it's good to do the following:
exports.version = JSON.parse(
  fs.readFileSync(__dirname + '/../package.json', 'utf8')
).version;
This way you only have to change the library version in a single place, so it will be easier to create an script that parses this single file and updates the version.
3. Update the changelog
Keeping an updated changelog manually is a tedious task, so there are a lot of developers who don't do it at all. Even though, you should create it and mantain it updated: it will become really helpful for the developers using your library.
The standard in most GitHub projects is to use a file called History.md located in the root
of the project. The file should be written in Markdown format and should contain the full library
changelog.
You can format this file using your preferred layout, it's important to specify the version dates and to format it clearly. This is the layout I use:
### 0.1.3 — *November 17, 2011*

  * Fixed the GitHub publishing of tags in the jake task
  * Updated package.json to make it compatible with Node.js 0.6.x
  * Updated travis YAML file to use the new Node.js support on Travis

### 0.1.2 — *November 14, 2011*

  * Updated Jakefile with tasks to automate publishing new versions
  (...)
The best way to automate the generation of this file is by getting all git commit messages since last version. If you commit your changes using well formed commit messages, then each commit summary can be used as a single bullet point in the changelog.
How can this be achieved? It's very easy: with git and the following single line command you can get all the changes since last created tag.
$ git log `git describe --tags --abbrev=0`..HEAD --pretty=format:" * %s"This command prints all the changes between some initial revision and the HEAD, formatted as a plain text bulleted list.
The initial revision is calculated using the command git describe --tags --abbrev=0, which outputs
the most recent tag that is in the same branch as the current HEAD.
4. List all the contributors
It's important to give credit to the people who contributes to your library: this way you may encourage more people to join to your project and help you.
An standard way to do it is by creating an AUTHORS file in the root of the project with the
following format:
John Doe <[email protected]>
Chuck Norris <[email protected]>
Bruce Wayne <[email protected]>
(...)
To get all the contributors, git is there again to help you: you can get all the commiter names and their email address by calling the following command:
$ git log --all --format="%aN <%aE>" | sort -uSo you just have to replace all the contents in the AUTHORS file by the output of the command above.
5. Update the library website
It's nice to have a public website for your library: It gives you more visibility on the Internet and
it can display your package documentation in a more personalized way. GitHub allows packages to have
a public web site with static pages, so you don't need to pay for a host and you can update your package
site directly with git.
Creating the main page based on README file
I recommend you to reuse the main README.md file of your library for the public site: if your readme
is good enough it will be more than enough,
and this way you won't have to update two different things each time you modify your library
(remember you dont' want to repeat yourself!).
For doing so, you must use a markdown parser that outputs mardown code to HTML. You can use the official one, or use any markdown library written in your library language.
An easy way to generate a full HTML file from a Markdown is by using two partial HTML files (a header and a footer) and then insert the markdown output within them.
The header partial file would look like:
<!DOCTYPE html>
<html>
  <head>
    <title>My awesome library - a library full of awesomeness</title>
    <link rel="stylesheet" media="all" href="stylesheets/main.css" />

    <script type="text/javascript" src="javascripts/sh_main.min.js"></script>
    <script type="text/javascript" src="javascripts/sh_javascript.min.js"></script>
  </head>
  <body>
    <a class="forkme" href="http://github.com/rafeca/awesome" title="Fork me on GitHub">
      <img src="gfx/forkme" alt="Fork me on GitHub">
    </a>
    <div id="container">
And the footer file like:
</div>
    <script type="text/javascript">sh_highlightDocument();</script>
  </body>
</html>
Between the header and the footer files you can add as much information as you want, for example the changelog, the contributors and even the license:
$ (markdown README.md && markdown History.md && markdown AUTHORS && markdown LICENSE) | cat docs/_header.html - docs/_footer.html > docs/index.htmlThis command will insert the output of the four markdown files between the _header.html and
_footer.html files and then save the resulting file as index.html in the docs/ folder.
If you prefer to have multiple pages in your site instead of one large page, you can still do it by calling the previous command multiple times with different contents:
$ (markdown README.md) | cat docs/_header.html - docs/_footer.html > docs/index.html
$ (markdown AUTHORS) | cat docs/_header.html - docs/_footer.html > docs/authors.html
$ (markdown LICENSE) | cat docs/_header.html - docs/_footer.html > docs/license.html
Creating the example pages
As I said before, Docco library parses regular code files and transforms them to HTML files with all the comments displayed alongside the code.
Executing the Docco command is trivial:
$ docco examples/*This will create an HTML file in the doc/ folder for each file in the examples/ folder. It
will also create a docco.css which will make the HTML example files look beautiful.
Creating/updating the gh-pages branch
Now you have the full public site inside the docs/ folder, which will look more or less like this:
$ tree docs/
docs
├── example1.html
├── example2.html
├── docco.css
├── index.html
├── images
│   └── logo.png
├── javascripts
│   ├── sh_main.min.js
│   └── sh_javascript.min.js
└── stylesheets
    └── main.css
What we want to do now is to move all those files to the gh-pages branch to allow GitHub to create
our repository Page.
To do so, most developers create the gh-pages as a new root branch and then copy manually all the
files in the docs/ folder to the gh-pages branch and then commit the changes. This approach is
totally valid (actually, GitHub Pages instructions recommend to do it this way). Even though, if you
use this method you'll end up having the gh-pages branch completely independent from the master
branch (so both branches won't have any relashionship and then it'll be hard to know which revision
of the library the web site is from).
Check this screenshot of the network graph of a regular library (the Mocha test framework):
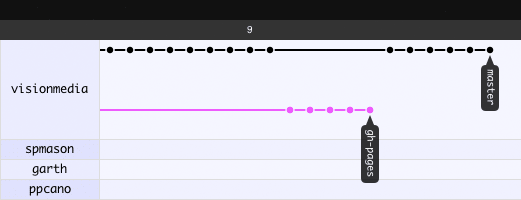
As you can see, the gh-pages branch goes independently of the master branch.
So, a better way to copy the docs/ folder to the gh-pages branch is by creating the gh-pages
branch as a regular git branch, remove everything from the branch but the docs/ folder and
move the docs/ folder to the root of the branch. The final step is commit everything in the gh-pages
branch.
To do all this we only need the following 4 commands:
$ git checkout -b gh-pages
$ ls | grep -v docs | xargs rm -rf
$ git mv docs/* .
$ git commit -a -m "Initial commit in pages branch"
This has to be done only once: once the branch is created, everytime you want to update the gh-pages branch
you only have to merge the changes from the master branch:
$ git checkout gh-pages
$ git merge -s subtree master
It's important to specify the Subtree merging strategy when performing the merge, this way git will
detect that all the changes in the docs/ subfolder have to go to the root folder and you won't get
any conflict when merging.
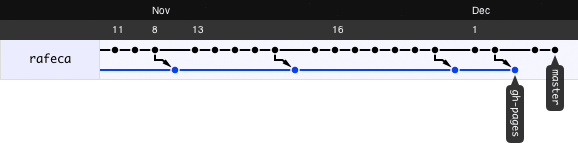
With this last way of copying the site to the gh-pages branch, we get the following history tree, which shows
clearly the relation between the public site and the library code:
6. Push all the changes to GitHub and create the tag
Now that everything is ready, you only have to create the git tag and push everything to GitHub:
$ git tag 1.0.0
$ git push origin master gh-pages 1.0.0
7. Publish the new version to the correspondent library repository
This last step depends on the package manager where you want to upload your library. Most package managers provide really good tools that simplify a lot the upload process... for example, if you use RubyGems you'll only have to do:
$ gem build myawesomelibrary.gemspec
$ gem push myawesomelibrary-1.0.0.gem
Or in Node.js if you are using npm it's even simpler:
$ npm publishOne more thing...
If you are developing Node.js packages, you can check out my Release Tools package, which implements all those automatisms (some of them are even improved) and exposes everything in a very simple API. For instance, the whole previous release process can be automated using the following task:
releaseTools = require('releasetools');

Step(function(){
    releaseTools.updateVersionInPackageJson('minor', this)
  }, function(){
    releaseTools.updateChangelog(this)
  }, function(){
    releaseTools.updateAuthorsFile(this)
  }, function(){
    releaseTools.createExamples(this)
  }, function(){
    releaseTools.commitToGit(this)
  }, function(){
    releaseTools.createSite(this)
  }, function(){
    releaseTools.updatePagesBranch(this)
  }, function(){
    releaseTools.pushToGit(this)
  }, function(){
    releaseTools.npmPublish()
  }
)
« Home